Scars can give a miniature personality, make it stand out. They can also help to mask small sculpting or casting imperfections.

Scars on miniatures add character, tell a story, and create visual interest that draws the viewer’s eye to your figure. In this article, I’ll show you how to add scars and scarifications to your miniatures. I’ll provide step-by-step guidance and practical tips for realistic effects.
You’ll learn simple ways to sculpt and paint scars, from fresh wounds to old healed marks. You’ll also see how to approach scarifications for striking cultural details. With a few tools, patience, and practice, you can give your miniatures a story written on their skin. As always, I will be adding examples of miniatures I’ve painted myself, so you can see how they look in real life.
Quick Key Points: Adding Scars & Scarifications to Miniatures
- Purpose: Scars on miniatures add personality, character, and visual interest. They can also cover minor sculpting or casting flaws.
- Tools: use Liquid Green Stuff (or alternative), fine brushes, and patience. Optionally, you can use a magnifying glasses for smaller scales.
- Preparation: The Miniature should be clean and oil-free; scuffing the surface is optional. Best to add scars before priming.
- Types of Scars:
- Protruding: Raised above the skin; built in thin layers to add texture.
- Receded: Sunken below the skin; build volume around it, adding subtle surrounding texture.
- Painting Scars:
- Fresh: Redder, darker, slightly muted tones.
- Old: Lighter or darker than the surrounding skin, depending on tone.
- Non-human: Follow the same rules, adjust colours to suit your character.
- Scarifications: Use precise patterns, keep organic shapes, and respect cultural significance.
- Tips: Be patient, add subtle contrast, avoid overuse, and experiment with different mediums.
- Scale Matters: Larger miniatures allow more detail; smaller scales need thinner, simpler scars.
- Extra: Scars can hide sculpting flaws, enhance storytelling, and add realism to your miniature.
Why sculpt scars on miniatures?
Well, you don’t have to modify your miniatures at all. It’s perfectly fine to paint them as they were created by the sculptor. I myself like to leave a bigger mark on the figure than just the paint. For me, scars aren’t just a cosmetic detail; they add history and character to my figures.
Well-placed scar can:
- Personalise the character: Each scar tells a story or hints at a past battle. We find an old warrior with skin criss-crossed with scars more authentic than someone with flawless skin, don’t we?
- Divert attention: If a sculpt has minor flaws, by adding scars, we can focus the viewer’s eye elsewhere.
- Add texture: Breaking up a flat surface with small details makes your painting more dynamic and engaging. It will give you the chance to showcase your painting skills.
For example, while I was getting the Medieval bust from JMD Miniatures ready for painting, I saw something off with his eyes. The inner corner of his left eye was sculpted so deeply that it looked very unnatural. And when I noticed that, I couldn’t unsee it or ignore it. It was bothering me to the point of almost dropping the bust and giving up on painting it altogether.

But I really liked everything else on this sculpt. I already had ideas about how to paint it. So I had to get creative and figure out what to do with this poor eye so it would stop bugging me so much. Back then, I wouldn’t have been able to completely re-sculpt this area, so I had to come up with an alternative. I settled on giving him a scar and a blind eye. This drew attention away from the eye and added a new point of interest.
Tools and materials you’ll need to create scars on miniatures:
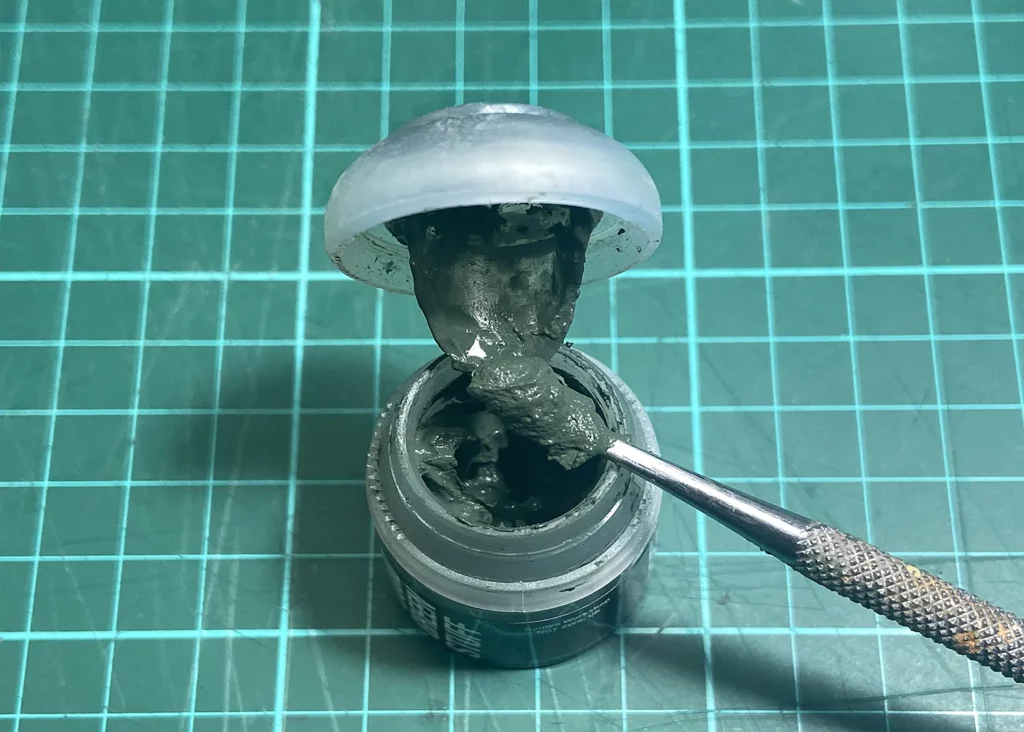
- Liquid Green Stuff – as the name says, liquid putty that can be applied with a brush. You can try alternatives, such as Tamiya Basic Putty. It just needs to have a creamy consistency.
- Small, fine-tipped brushes – preferably old ones, the putty is harsher on them than paint.
- Hobby knife – in case you need to scrape something off.
- Patience (seriously, take your time with each layer!)
- Optionally – a magnifying glasses if you are working on a smaller-scale miniature or intricate details.

Preparing the surface of your miniature
There is no special preparation needed. The miniature should be clean and free from dust and oil, just like you prepare it for priming. If you’re sure you want a scar here, you can gently scuff the surface with high-grit sandpaper. But this step isn’t required. In my experience, the putty sticks well to resin, plastic, and metal. So, you don’t need to worry about that.
It’s best to add scars and scarifications to your miniature before priming. You’ll handle it a lot during this process, and will need to wash it later. But if you discover a flaw in your miniature after priming, you can still add scars to cover it. Just be careful when holding the miniature. You should also be able to wash the primed mini; just be careful not to scratch the surface.
Step-by-step guide to sculpting scars on miniatures
Scars usually form in two ways:
- Protruding scars, where the scar tissue is raised above the skin.
- Receded scars, where the scar sits below the level of the surrounding uneven skin.
Creating the protruding scar:
- Sketch the scar. Using a thin brush, apply a small amount of Liquid Green Stuff to mark where you want the scar. Start with a light layer, so you can easily remove it if you don’t like the shape. You will work on the texture and dimension in the further steps. To make your scar look more realistic, keep the scar’s shape jagged and irregular, mimicking the appearance of real injuries.
- Build up layers. Once the first layer dries, start adding more putty gradually. Make sure each layer dries completely to prevent smudging. This helps your scars protrude naturally while staying thin. The drying time depends on the material you use. You should check the product specification for more info. For thin layers of Liquid Green Stuff, I typically wait 15–30 minutes.
- Add texture to scars. Scars from the battlefield rarely heal smoothly. To make your scar look more realistic, add small bumps and irregularities to the area. You can add tiny peaks or thicker points to create variation. Even a slight smudge under the eye can add realistic skin texture.
- Fine-tune shapes. Check your sculpt from different angles. Adjust the height or shape as needed before moving to the painting.
Creating the receding scar:
When you work on a receding scar, use the same technique as above, but reverse your approach.
- Sketch the scar. This time using a pencil or thinned-down paint on a paint brush, mark where you want the scar to be. Keep it organic and irregular.
- Build up layers. The scar itself is concave, but we want to avoid digging into the sculpt’s surface. Instead, add more volume around it. Make sure the tissue is uneven and jagged. Work in thin layers to better control the results.
- Add texture. The scar is usually less textured and bumpy than the protruding one. But it pulls on the surrounding tissue, creating texture around it.
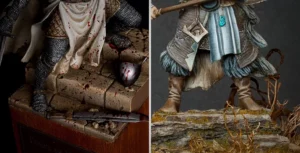
In the photos below, you can see how I created protruding scars on the Veteran bust. I accidentally smudged a bit of putty around his eye, but in the end, it added even more character.


As you can clearly see, I’ve added the scars not only after priming the bust, but also after I had already begun painting it. So it is possible, even though it would be easier to do it before.
If you are unsure of your sculpting skills, you can test the technique on a failed print or a spare part. This will give you a chance to practice different shapes, find out what you like, and what is too much. Then you can work on your miniature with more confidence.
Painting realistic scars
I don’t usually share paint recipes. I don’t know which skintone you want or what paints you have. Still, here are some general rules to help you choose wisely:
Fresh scars:
The general rule is that the fresher the scar, the angrier and redder it looks. So add reddish hues to the skin tone of your choice. Apply it especially in inner corners or raised areas. Just don’t use too bright and warm red, it will look unnatural. Aim for darker, slightly muted and colder tones. My favourite colour to use for that is Sanguine Base from P3, precisely for those reasons. I prefer to add it as a glaze for better control.
Old, healed scars:
With age, scars tend to fade to a paler tone than the natural skin colour of Caucasian skin. For individuals with darker skin tones, old scars may appear darker than the surrounding skin. This occurs because melanin production is disrupted during the healing process.
To paint scars that healed ages ago, use a lighter tone than the surrounding skin. The easiest way to create a realistic tone for your scar is to mix a bit of off-white to the skin tone you are using. You can also try colour like ‘Jack Bone, or Menhom white (from P3 again).
Scars on non-human skin tones:
When painting a non-human character with unusual skin colours, such as green or blue, follow the same basic rules. If a scar is fresh, the skin often looks more irritated. The tissue around it can show more blood colour. It doesn’t have to be red; you can choose any colour you like, as long as it looks reasonable. For old scars, choose a shade that’s lighter or darker than your skin tone. Pick what looks best with your colour scheme.
As you can see, for the Veteran, I went between fresh and healed scars. The scar tissue is fading to a lighter shade than his skin, but it is still noticeably angry and redder in the surrounding area.


To emphasise the damage around the eye, I wanted the eye itself to appear blind and damaged. To achieve that, I painted a white film over the iris. Then, I added subtle red veins to give it a severely injured appearance. I wanted to create a look that would explain the weird shape of this area. Hopefully, it will also add some backstory to the character.
Scarifications on Miniatures
Scarification is a deliberate skin modification used historically in rituals or as self-expression. It is created by intentionally cutting the skin, resulting in detailed patterns. In current times, it’s sometimes used as a form of body modification. I will skip the details, as they are quite gory. You can conduct your own research if you would like to know more. Just know that the desired effect is scars as raised as possible.
Scarification used on miniatures can be a unique way to add detail and character. It works exceptionally well for fantasy or tribal figures.
How to sculpt scarifications:
- Use the same layering technique you practised for scars. Focus on creating precise patterns or shapes.
- Build layers slowly for a neat, controlled effect.
- Keep designs organic. Real scars, even those done deliberately, vary, so minor asymmetry can look natural.
- Research tribal scarifications before applying them, so you can use them properly.
I tried this on a bust called Grinder, adding some Aztec/Mayan-inspired patterns. In the photos below, you can see the prominent scars on his chest, that look like made by an animal. He also has a sun-like scarification pattern on his shoulder. As with the Veteran, I was working in layers, waiting for the putty to dry completely before applying more. I was cleaning up the shapes after painting each layer to keep the design tidy. That being said, it’s still an organic design, so some imperfections and irregularities are to be expected. They add realism as skin doesn’t heal perfectly.


Scarification designs:
When it comes to the designs themselves, you can opt for a tribal style. You can use geometric designs varying from relatively simple to elaborate. It’s best to Google ‘tribal scarifications’ for ideas and historical accuracy. You, of course, need to be mindful of cultural significance and treat tribal scarifications with respect.
If you want a more modern approach, only your imagination is the limit, and the internet is full of examples. Heads-up: searching for ‘contemporary scarifications’ might show intense images, so proceed with caution.
Frequently Asked Questions
Adding scars on miniatures often raises practical questions. People ask about tools, durability, and painting methods. Here are answers to common questions hobbyists have about the subject.
Can I paint scars on miniatures instead of sculpting them?
Yes, of course, you can use paint alone to show scars. This works well for smaller miniatures or minor injuries. To create a realistic painted scar, consider how real, three-dimensional scars reflect light. Using a fine brush, add thin lines or slightly raised highlights with lighter or red tones. Sculpting with putty creates more realistic scars. However, if you’re not comfortable with putty, paint-only scars can also work.
What materials can I use besides Liquid Green Stuff?
I use Liquid Green Stuff since I have it at home. You can try Tamiya Basic Putty, Vallejo Plastic Putty, or any sculpting medium that is liquid but firm. The key is to use something that stays where you apply it and can be built up in thin layers.
I don’t like the scars I’ve created. What now?
If you don’t like the scar you’ve made or want to change its shape, you can scrape it away with a hobby knife and fine sandpaper. Just be careful to avoid damaging the surface or hurting your fingers. It definitely works for Liquid Green Stuff. I’m not entirely sure how that would work for other types of putty, so it’s best to do a test run on a sprue or spare part.
How durable are the added scars?
I only ever used Liquid Green Stuff to create scars, and it’s a weird putty, as you might know. The added scars look and feel durable enough, but I wouldn’t risk treating them too harshly. There is no need, really. You can wash the sculpt delicately before priming, and everything should be ok.
How does the scale of the miniature impact scars/scarifications?
The larger the scale, the more space you have for changes. This also allows for more detailed scars and scarifications. With smaller scales, you can still add them, but they will have to be thinner and simpler in shape. The elaborate shapes will either overwhelm the figure or lose definition. You also need to be more precise and careful when applying putty to smaller models. Make sure you don’t smear it on the part too much.
How do I paint a blind or damaged eye on a miniature?
A blind eye more often than not looks like a healthy one. However, for visual interest, it’s better to paint it differently. Start painting the eye like usual, marking the iris with the intended colour. After that, cover it with a pale, whitish film, making sure that the iris is still somewhat visible. Then you can add extra red veins on the sclera (the white part of the eyeball).
Summary
I hope I have shown you that scarifications and scars on miniatures are more than just surface details. They can enhance a character’s story or completely change it. With this technique, you can create a battle-hardened veteran, ritual-marked mystic, or berserker. Start small, test on practice models, and soon you’ll add scars with confidence. I’d love to see how you use these ideas. Please share your results and continue to push your painting to new levels.
And if you’d like to read more about painting natural looking skin tones – feel free to check the article about just that.